

How To Design Video Game Combat
Introduction
We've all been there. You opened that ship designer and wondered what on Earth (or whatever your homeplanet is) all these numbers mean. So you just press the autocomplete button, build a bunch of these ships, and start a war. Then you find an enemy fleet. "Great!" you think. "They only have 2k fleet power, while my fleet is 3k!" So you attack, and they completely wipe the floor with you. "Why?" you wonder. "What did I do wrong?"
When you're designing your ships there's a lot of information you have to keep track of. Hull? Shields? Cooldown? Power? Damage? Tracking? Range? What does all this mean? What is important and what is not?
You might think it can't matter that much. After all, there's this nifty auto-complete button for your ship design, how bad could that be? And sure, it'll do, most of the time. But if you want to truly be the best at warfare, to beat enemies many times bigger than you while using a fleet that's as manageable and economical as possible, you need to understand how combat works.
I'm going to tell you all about it. First, I'll explain what the different stats mean through an example. We'll fire a weapon at an enemy ship and go through each step to see what happens during combat.
Then, we'll take a more in depth look at how different modules and weapon types work. What's the difference between shields and armor? When do you use lasers and when do you use missiles? What are all these obscure rare weapon types?
Once we understand what goes into a ship, we'll talk about one of the most important yet most often ignored aspects of Stellaris combat: retreat and disengagement. How you minimize your losses in defeat is just as important as how you maximize the casualties you inflict in victory.
Finally, we'll look at a practical example of an enemy fleet composition, and we see how we can build our own fleet to counter it as best we can.
Stats, what do they mean?!
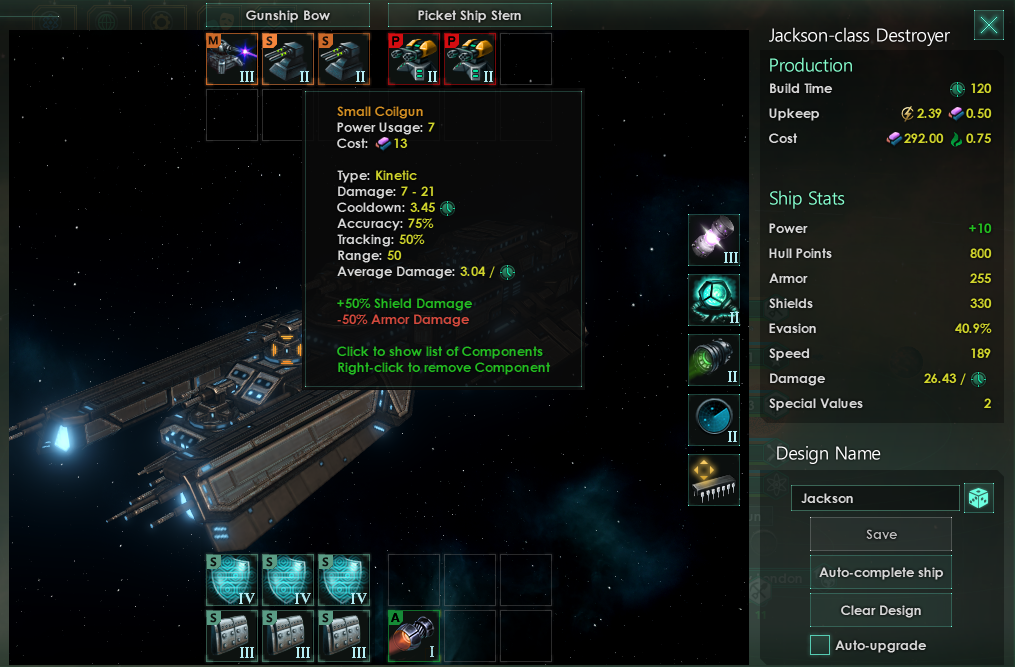
In this section, we'll look at all the different stats relating to combat. We do this through a practical example. Let's take a look at this destroyer design and one of its weapons, a Small Coilgun:
In our example, a ship made of this design, a Jackson-class destroyer, will be our proud fighter, engaging this enemy corvette:

There are a lot of stats to look at here, both ship-wide like Speed, Hull, and Evasion, and stats specific to the weapon like Range and Damage. We will now see how each stat comes into play during combat.
Getting in close: Speed and Range
Before fighting can begin, our ships first need to find the enemy and get close enough for combat. Speed (also known as Sublight Speed) is the speed your ship will have when travelling through a system. Smaller ships tend to be faster. Having faster ships is always good, as it allows your ships to get in range quicker. Our destroyer has a speed of 189 while the enemy corvette has a speed of 176. So our ship is slightly faster than the enemy's, which is good if the enemy is trying to flee from us, since we'll eventually overtake them.
That brings us to Range. Each weapon has a range value. Our highlighted weapon, the Small Coilgun, has a range of 50. This means that unless there's a target within distance 50 of the destroyer, this gun isn't shooting at anything. This is why speed is useful, especially for weapons with low range. It allows you to get close and fire those guns as fast as possible.
Aiming and Evading
Now we've engaged the enemy corvette and our weapon is in range to fire. Now we're going to see if we actually hit. There are three stats that together form the total Chance To Hit .
First and foremost is the enemy's Evasion. This is a measure of how maneuverable the ship is and how well it can react to enemy fire. Smaller ships with good thrusters tend to have good evasion. After all, it's much easier to turn a small fighter than a three-mile long battleship. The enemy corvette has an evasion of 63%.
The attacker's counter to evasion is Tracking. Tracking means how good a gun is at predicting where the enemy will move next and adapt accordingly. Our coilgun has a tracking of 50%, and our lvl 2 sensors add another 5%, giving our shot a tracking value of 55%. The tracking value is subtracted from the enemy's evasion to form Effective Evasion. In our example, the enemy has an effective evasion of 63 - 55 = 8%.
Finally we have Accuracy. Accuracy describes how good the weapon is at firing at an enemy ship in general. The coilgun has an accuracy of 75%. Now Effective Evasion is subtracted from the accuracy to get the Chance to Hit. So here we get a CtH of 75 - 8 = 67%. This means that there's a 67% chance of the shot connecting and doing damage.
You might be wondering what the real difference is between accuracy and tracking. After all, they both increase your eventual chance to hit. Weapons tend to have either fairly good accuracy and low tracking, or medium accuracy and a lot of tracking. The difference in their performance depends on how good the enemy is at evading. If your weapon has accuracy 70 but 0 tracking, and the enemy has 60% evasion (common for corvettes), that means only 10% of your shots are going to land. But if your enemy has 5% evasion (common for battleships) you hit 65% of the time.
If, however, you use a weapon with 40% accuracy and 70% tracking, the corvette will have 0% effective evasion (the tracking completely negates the evasion, and even has a bit of overkill), and you'll hit 40% of the time. However, against the battleship you will also hit only 40% of the time. So it very much depends on the enemy ship types how much tracking and accuracy you want.
Blowing stuff up: Health, damage, and reloading
So we hit our enemy ship! It'll go down now, right? If only it was that simple. The first thing that happens is the Damage Roll. All weapons have a range of possible damage values they can inflict, and the game will randomly pick one within this range. Our coilgun has a range of 7-21, meaning it'll do 7 damage at the least, and 21 damage at most. All values in the range are equally likely to be rolled. Note that over the course of a battle you tend to fire hundreds or thousands of times. Over all these shots damage will average out to the middle of the range (in this case 14), so RNG really doesn't have as much of an impact through damage as it might seem at first.
Once the game has rolled for damage, it then needs to inflict that damage. Ships have 3 main stats related to their health.
The first and most important stat any ship has is hull. Hull is, simply put, the amount of hitpoints a ship has. A ship is destroyed and removed from the game when its hull level reaches 0. The corvette has 440 hull.
The next stats are armor and shields. These are additional health bars. When you design a ship from scratch, it starts with 0 shields and armor, but by adding defensive components you increase this value. The way they work is that any damage you take is subtracted from shields first, and only when all shields are gone, armor will be damaged. Only when armor is gone, hull is damaged. If shields are damaged, they will automatically recharge once out of combat. Hull and armor has to be repaired at a starport. The corvette starts with 170 shields and 65 armor.
Weapons have different advantages against the different health types. Our coilgun, for example, does 50% extra damage against shields but 50% less damage against armor. So let's say we get lucky and we roll a 18 on the 7-21 damage roll. If the enemy corvette has 12 shields left at that point, we use 8 of our damage to remove the last of those (with the extra 50% damage) and then the remaining 10 damage is inflicted on armor, which is lowered by 5 (because of the 50% damage reduction to armor).
We'll be looking at weapon types in greater detail in the next section, where we see all kinds of different weapons and the way they counter or avoid these defense strategies.
The last value we need to look at is Cooldown Time. After a weapon fires, it needs some time to reload and prepare another shot. Our coilgun takes 3.45 days to fire again. A bunch of techs and bonuses in the game improve your Firing Rate. These modifiers lower cooldown time. So getting 100% more firing rate simply halves cooldown.
The game helpfully provides an Average Damage per day value, based on cooldown time, damage, and accuracy. Obviously in practice this won't always be the damage you inflict, since that also depends on evasion, tracking, and damage increase/reduction, but it's a good baseline to quickly compare different weapons.
Countless ways to kill people: A guide to weaponry
In this, we'll be looking at the different components you can put on your ships, and the pros and cons of each of them. Now,
I won't be min-maxing here. I'm not going to calculate absolute DPS or maximum damage for every weapon type here, or tell you which one is objectively best. Because first of all, the game might get rebalanced after I write this, so any advice I'd give in that regard might become obsolete. Second of all, I think you, the reader, can very well find that out by yourself, if you're interested. I'm simply trying to teach you the basic ideas of combat and ship design, not tell you what to do in every situation.
Sections and Weapons Sizes
The first thing you have to do when you start a new ship design is pick Sections for your ships. You get several choices, each with different weapon types and sizes.

When you design a ship, you'll notice that your weapons and defense components (the little squares you put your lasers and shields in) come in three different sizes: Small, medium, and large. In general, Medium is twice as 'good' as small, and large is twice as 'good' as medium. What 'good' means depends on the type of component. A medium shield provides twice as much shield power than a small shield. A large laser does about twice as much damage as a medium laser. There are some exceptions to this, but that is the basic gist. Notice how in the picture (of battleship sections) you get the choice between three L weapons or 2 M weapons and 2 L weapons. The 2 M weapons mostly balance out the third L.
However, sizes tend to have tradeoffs. Larger weapons tend to have much higher damage and range, but lower tracking. In general Large weapons are still stronger than an equivalent Small weapon, but against a horde of corvettes with high evasion you might want to use different weapon sizes than when fighting a citadel with 0 evasion. If you have enough large long-range weapons you also might be able to damage or destroy corvettes before they get into their range to attack you, despite their high evasion.
In addition to standard weapons with sizes, some sections also offer some different weapon types: Explosives (G), Point-Defense (P), and Hangars (H). We will explain those in a bit.
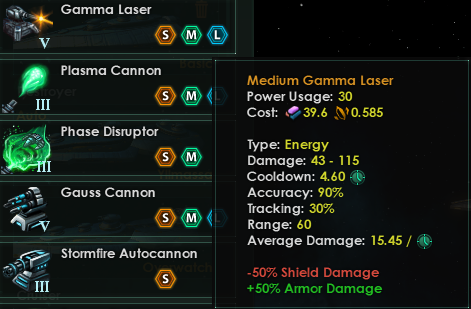
Kinetic and Energy Weapons
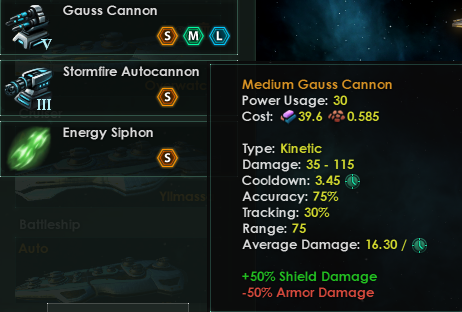
The main weapon slots, the ones that can be S, M, or L, are pretty much always filled by either a kinetic weapon or an energy weapon. Kinetic weapons fire projectiles accelerated to incredible speed at enemy ships, like the guns in Mass Effect. Kinetic weapons are good against shields, but weak against armor.
Energy weapons are the exact opposite. They use direct energy: plasma, lasers, electricity, to damage the enemy ship. Energy weapons are good against armor but weak against shields.
In general energy and kinetic weaponry is the backbone of your loadout: The majority of your weapon slots will be these, and the big choices here are about balancing their ratio. If the enemy has a lot of shields, go for kinetic. A lot of armor, go energy. To take on a variety of enemies, you'll want a mix of them.
Note that range comes into play here as well. Kinetic weapons tend to have longer range than energy, and shields will be attacked first. So when designing your fleet you might want to make your long-range artillery kinetic, since they'll fire first and whittle down shields, and that's when short-range energy weapons have come in close to take down armor.
Point-Defense, Explosives, and Strike Craft
Explosive Weapons

Explosive weapons use self-propelled devices, like torpedoes and missiles, to deliver huge bombs to the enemy. If you look simply at the Average Damage per Day value and compare it to kinetic and energy weapons, you'll notice explosives tend to have way higher damage than regular weapons of the same tech tier. In addition to that, explosives tend to have Penetration. Penetration means it completely avoids the health bar and will directly damage the underlying bar. For instance, this explosive has 100% shield penetration, meaning it will do its full damage to armor and hull, so shields won't need to be taken down to destroy the enemy.
So if you see these stats, you might wonder why you wouldn't just slam as many torpedoes as possible on your ship. Surely they're the key to victory, right? And indeed, explosives have the potential to do massive damage. But they also have some major drawbacks. The first is that unlike kinetic or energy weapons, which hit instantly the moment they fire, explosives take time to travel to the target. The time depends on the missile's speed. You'll notice in the above picture that the missiles have their own independent stats. This leads to a delay in you dealing damage, time in which regular weapons are already blowing up ships.
Another stat you'll see there is Retargeting Range. Explosives are fired at a specific target (typically the first target that came in range). If this target is destroyed before the explosive reached it, it will attempt a retarget. If there is another enemy ship within its retargeting range, it will attempt to hit that target instead. Often retarget range is big enough to encompass the entire enemy fleet, but if the enemies are divided into close-ranged corvettes and long-ranged battleships, for example, destroying the last corvette might mean the battleships are out of retarget range, meaning all the missiles still going will have no new target and will self-destruct before they can do damage.
But the biggest drawback is that there is a risk of explosives doing no damage at all, thanks to...
Point-Defense

Point-Defense (PD) modules are tiny flak guns or lasers specifically designed to shoot down small fast-moving targets. Unlike other weapons, they can shoot down explosives coming your way, preventing them from doing damage. PD will prioritize firing at any explosive within its (small) range, inflicting damage according to the same rules as firing at a regular ship. If a fleet has enough PD, it can counter virtually all enemy explosives, rendering them useless.
Note, however, that using PD means sacrificing regular weapon slots, meaning you won't be doing as much damage to enemy ships as you would without the PD. PD has a maximum range of only 30. We'll look into different ranges later in the Combat Computer section, but for now it suffices to say that only corvettes and destroyers will want to stay at such short-range. So if you put PD on a corvette and it is withing 30 range of a ship, the PD will also shoot at the enemy ships, dealing decent damage. If you put PD on a cruiser that'll stay at range 50, however, the PD will only help if the enemy decides to come to you, like with a flock of corvettes.
When you're considering adding explosives to your ships, note that explosives tend to be a "Go big or go home" strategy. Explosives only work if you can overwhelm the enemy countermeasures. If you're launching so few they can easily stop you, those explosive weapons do no damage whatsoever. But if you are overwhelming them, each additional torpedo is one that's almost guaranteed to hit. Explosives can be a great way of slaughtering your enemies, but only if you go all-in on them.
Strike Craft

Finally there's Hangars providing Strike Craft. Strike craft are small spacecraft launched from the bigger ships. Think TIE-Fighters from Star Wars. Strike craft act as a combination of explosives and PD, existing as separate entities that can attack explosives, other strike craft, and enemy ships, but who can also be targeted by PD. Strike craft don't just fly into the enemy ship and go BOOM like explosives, however. They stick around, acting as additional ships providing continuous fire. A hangar launches a set number of strike craft (in this case 8). If a ship's strike craft get shot down, it will launch more every now and then (about once every 4 days for this one) until it has reached the max again. This means that, if the enemy cannot shoot down strike craft, they will all get in close and whittle down their targets with a lot more damage than other weapons do.
Like explosives, they are hard-countered by PD or an overwhelming amount of enemy strike craft. Although strike-craft have the potential to inflict more damage than explosives, they do so over a longer period of time, while explosives inflict a lot of damage instantly if they get through. So if your enemy has a strong defense array, your strike craft will be shot down before they can fire that much.
For defensive purposes, smaller ships tend to have PD, while only bigger ships (cruiser and up) can have hangars. This effectively gives you two choices to protect yourself against enemy explosives and strike craft: one is to use a picket line of PD-carrying small ships (usually destroyers) to intercept them. The other is to have carrier cruisers or battleships that launch strike craft to engage enemy small movers. Both options can also do damage to enemy ships, either through direct short-range fire from the PD modules, or from your strike craft engaging the enemy ships directly. Which choice is best depends on your preferred playstyle and enemy fleet composition.
One other thing to note here is that there are two different types of Point-Defense: One is Flak, the other is also called Point-Defense, but I like to call them PD lasers. They function mostly the same way, with the only major difference being that PD lasers do more raw damage, but flak has good tracking. This makes flak a lot better at fighting strike craft, who have good evasion, while PD lasers are a little better at fighting explosives that have no evasion.
If you want to use strike craft offensively, the same point applies as to explosives: Go big or go home. Adding just a couple of hangars to an otherwise regular-weapon-focused fleet isn't really gonna do extra damage to most enemy fleets. Either play it safe and go for a regular weapons build that can't be intercepted, or overwhelm the enemy with more strike craft and torpedoes than they can handle. There's no real middle road here, especially if you want to use the Carrier type combat computer, which puts the carrier at a range where no regular weapon can hit the enemy.
The non-shooting parts of your ship
As much as you might hate it, not every single part of your ship is a weapon. There are three other categories of components: Defensive components, support, and essentials.
We'll start with the essential components. These are located on the right-hand side of the ship designer. These are your ship's most basic functions: Generating power, movement, and sensors. Unlike with weapons there's not much choice in which type of component to pick: if you unlock a better version it's almost always better to update to that newer version.
Reactor
First and foremost we have the Reactor. This is what generates your ship's Power. Nearly all modules, from weapons to shields to other essentials, cost power to operate, and this reactor provides it. Your ship design must have positive power, or you can't build it. Higher level components cost more power, so as you research better weapons and shields you have to improve your reactor as well to keep up.
Excess power is not entirely wasted: for every 10% of power generated by the reactor that is not used, you get a 1% improvement in fire rate, evasion, and sublight speed. So if your reactor generates 1500 power and you only use 1200, you get a 2% improvement in those stats.
In practice using older modules to save power is never worth it. Such small bonuses mean nothing in battle compared to the strength you get from putting that power to use with better shields and weapons.
Hyperdrive
The hyperdrive is what allows your ship to travel along the hyperlane network at FTL speeds. Improving it doesn't help in combat at all, but it allows your fleets to move around the galaxy quicker, as with each upgrade it takes less time to charge a jump.
Eventually you can research the dangerous tech Jump Drive, which replaces the hyperdrive. In addition to the old hyperlane travelling it allows you to jump to any system in a set radius almost instantly, giving a major strategic advantage. However, note that using a jump drive will halve your sublight speed and firing rate for the next 200 days, making the fleet much weaker and much less capable of avoiding enemies.
Thrusters
Thrusters are the main engines on your ship. Better thrusters improve both sublight speed and evasion. Like the hyperdrive, thrusters allow your fleets to move around the galaxy quicker, as they can travel through systems to other hyperlane entry points much faster. In combat they are particularly good for small ships, both improving their evasion and allowing them to close in on the enemy faster. When you have a corvette with a maximum range of 30 on its weapons, you want it next to the enemy battleships ASAP, and thrusters help a lot with that.
Sensors
Sensors serve two purposes: They allow you to sense fleets that are several systems away, making it easier to prepare for an enemy attack or chase down a fleet trying to hide from you. Note that having just one ship in a system with good sensors gives you just as much sensor range as having an entire fleet, so if you're low on power getting worse sensors on some ships can give you that extra 5 power you need to break even without losing any sensor range.
The second purpose of sensors is that they give a flat tracking bonus to any weapon you use. This is particularly useful for big ships using large weapons, as those tend to have bad tracking.
Combat Computer and influence on ranged combat
The final essential module is the Combat Computer. This is the one essential part where there is a meaningful choice between different options. Depending on your combat computer, your ship will use different tactics and stay at different ranges. Each tactic also gives a small bonus to firing rate and one other stat.

There are 5 different tactics: Swarm, Picket, Line, Artillery, and Carrier. You should always pick a tactic where all of your weapons are in range. If you set your destroyer to Line, with range 50, and it has a laser with range 30, that laser won't fire unless the enemy corvettes come in close themselves. However, unless you use swarm you also tend to want to stay at the longest range possible, since it gives you more time to intercept enemies and explosives hurtling towards you.
Swarm is the default tactic for corvettes. It forces the corvette to get as close to the enemy as possible and fire at point-blank range. This is particularly good if your corvette is using explosive weapons, as they won't have to travel as far to the enemy and thus have less chance to get intercepted by Point-Defense. Swarm gives a bonus to evasion.
Picket is the next tactic, forcing ships to close in to range 30 and intercept enemies. This tends to be a good stance for destroyers, whose small and medium weapons tend to be short-range. Picket makes for good 'cannon fodder' ships. Enemies will have to break through your front line before they can target the artillery behind them.
Line is a fairly standard tactic for medium-sized ships like destroyers or cruisers. It makes them stay at a range of 50 and fire from there. Line improves Chance to Hit, making it useful at attacking any enemy. When in doubt, Line will usually be a good tactic.
Next there's Artillery. It improves weapon range, making it good for slow-moving long-range ships like battleships and titans to start firing as soon as possible. Artillery has a long range, 80, so make sure all your weapons have that range before using it.
Finally there's Carrier. Carrier sets the range at an immense 150, well outside any regular weapon range. This is specifically for ships that are focused completely on strike craft, whether for defensive cover against enemy torpedoes and strike craft, or used offensively against enemy ships instead of regular weapons. Carrier increases the ship's engagement range, making it easier for them to start a battle, and makes them send out their strike craft as early as possible.
Defensive Components
Just like you need modules to attack, you also need modules to defend yourself. Defensive components are for adding shields and armor, and with some salvaged tech, even more hull to your ship.

We discussed the difference between shields, armor, and hull health in the previous sections, so there's not much more to say about them here. Kinetic weapons are good against shields, energy weapons are good against armor, and some weapons penetrate one or both of them.
One thing to note, however, is that shields require power, while armor and hull do not. In general a shield module adds more total health than an armor module of the same level, but at the cost of power. A good way of designing ships is to first choose your weapons, essentials, and support, and finally add shields until you're out of power. At that point fill the rest with armor or hull. This will give you the most overall health.
Support
Finally there's support modules on the bottom right of the ship designer screen. Support modules tend to boost one stat by a little: There's Reactor Boosters for additional Power, Auxiliary Fire Control for more Chance to Hit, Shield Capacitors for better shielding, and Afterburners for more speed and evasion. There are some hidden techs that will give you secret support modules as well, if you can find them.

Which support module is best depends a lot on your ship and strategies, though I tend to say you can't go wrong with auxiliary fire control. CtH is always good. Afterburners are also useful. The speed and evasion increase is significant, especially on slower parts of the fleet like battleships and titans.
To Fight Another Day: Disengagement and Emergency FTL
You can't win em all. Even if you're stronger than the enemy fleet, your ships will still take damage, and even the greatest admirals have terrible luck or get overwhelmed by their foes. And even when you're nominally winning the battle, it can still be smart to pull back and continue the fight in more favorable conditions.
There are two big mechanics related to retreating: There's disengagement, which is what individual ships do outside of your control, and there's Emergency FTL, if you as the player order the fleet to pull out immediately.
Disengagement

Disengagement happens when a ship becomes damaged and tries to flee the battle on its own. Whenever a ship sustains hull damage when already under 50% hull, it will attempt to Disengage. Whether the disengagement succeeds depends on Disengagement Chance. The precise numbers on this are fairly hidden by the game, but we know it depends on several factors: First and foremost is the damage inflicted by the hit. A harder hit increases the chance of disengagement, probably modeling the crew being way more eager to get the hell out of there when half their ship is blown up than when they just suffer a glancing hit.
Ship type also matters: Destroyers and cruisers have the highest disengagement chance, followed by titans and battleships. Corvettes have the lowest chance. An explanation could be that the larger ships have more room for reactors and hyperdrives to go into subspace instantly, while the huge ships like titans have more difficulty than a smaller destroyer in finding a safe escape path.
Finally, there are a few ways you can improve your ships' chances of survival. There are some admiral traits like Careful that increase Disengagement Chance, as well as the War Doctrine Hit And Run. Meanwhile, starbase modules like the Communications Jammer, fighting in a Black Hole system, or a Titan Subspace Snare decreases the chance of enemies disengaging.
Once a ship is successfully disengaged it will not participate in battle anymore, instead waiting in subspace to rejoin the fleet at the end of the battle, whether that is in victory or defeat.
Note that disengagement depends on your ships surviving a direct hit while under 50% hull. This means that when faced with overwhelming damage (very common when dealing with explosive weapons), ships can go straight from 60% hull to 0, never getting a chance to disengage. It's also why the increased hull techs are particularly useful, since they increase the probability of your ships escaping alive, even if they lose the battles.
Always remember: Repairing is free, replacing costs a ton of alloys. You always want to maximize your own disengagement while minimizing the enemy's.
Emergency FTL
"One mark of a great soldier is that he fight on his own terms or fights not at all." ― Sun Tzu
When you're losing a battle and your ships are blowing up or disengaging left and right, it's often good to sound the retreat rather than lose the rest of your fleet. This is where the Emergency FTL comes in: A dangerous maneuver in which your fleet attempts to jump away despite being inside the system's gravity well.
After 30 days in combat either side can click the Emergency FTL button to instantly pull their ships out. This has the following effects:
- All ships currently fighting (i.e. not the ones that have already successfully disengaged) will sustain 20% hull damage.
- Ships that already had less than 20% hull at the time of the retreat will have a 50% chance of being destroyed. If they are not destroyed, they will emerge with 1 hull.
- Each ship, no matter their health, has a 1% chance of being destroyed in the escape.
- The fleet will go Missing in Action for a number of months, depending on how far away the battle was from friendly space. As it is in subspace it will not 'exist' on the galaxy map during that time, keeping it safe from enemy attack but also unable to fight invaders. Any ships that were already disengaged will join the fleet in subspace.
Note that if all ships in a fleet are disengaged or destroyed the same Missing in Action step happens for the disengaged ships.
This sounds like it sucks, right? All the ships get damaged, some might die, and they're out of action for several months, and then they have to repair as well! And yes, this is not an action you should take lightly. It's not like withdrawing in EU4 where you just lose morale. But there are still many cases in which this is worth it.
The obvious case is a defeat. When a battle turns against you the ships still fighting will take more and more damage while inflicting less, lowering their chances of just getting out alive via disengagement. It's rarely worth fighting to the last man. Like I said before, repairing is free, replacing is expensive.
But Emergency FTL can also be worth it to prevent yourself from walking into a Pyrrhic victory. Consider this battle I had recently:

My fleet is on the left there, the enemy's on the right. I had only lost 20 corvettes, 1 battleship, and my titan, while the enemy was suffering way heavier casualties! And yet the battle was 'lost'. I pressed the Emergency FTL button. Why did I do that?
The simple answer is that looking at the numbers underneath the fleets as they're fighting doesn't tell you everything about how the battle is going. Sure, my fleet still contained 60 corvettes, but when I looked at the battle screen, almost 40 of those had disengaged. Same with the battleships: 5 out of 9 remaining had already successfully disengaged. I was running the Hit and Run war doctrine and my admiral had the Trickster trait, increasing my disengagement chance immensely. So in effect I was fighting with just 20 corvettes and 4 battleships, many of whom were quite damaged, against over 100 enemy corvettes, with more reinforcements on the way. The enemy fleet meanwhile, had a whopping 4 corvettes that had managed to disengage, versus nearly 200 destroyed.
So although it might look from that screen like I defeated 10 times more ships than I lost, in reality it was much closer to 3:1. My ships were simply much better at disengaging.
Could I have won that battle, or at least taken down a hell of a lot more ships? I think I could have. My ships were technologically superior, even when outnumbered.
But while I was paused, considering my next move, I asked myself whether this was the best place to destroy those remaining ships. I was in no hurry: We were fighting in neutral space, quite far from any of my planets, and their fleet would probably have to repair and regroup as well.
So I retreated, losing one more corvette to the Emergency FTL and saving everyone else. All my disengaged ships rejoined the fleet, and less than three months later 60 corvettes and 9 battleships were back at a citadel for repairs.
The enemy meanwhile, had lost 10 times as many ships as I had. That was the battle that won me the war, even if the game declared it a defeat. I could cheaply and quickly replace the few ships I lost, while the enemy never recovered. And when I met that fleet again, fully repaired, I trounced the remainders.
Never truly discount the value of Emergency FTL. Even in battles you're winning you should always consider whether it's worth retreating and fight in more favorable conditions later. Perhaps your admiral died in battle, or you can see enemy reinforcements coming. Maybe another friendly fleet is coming to take over the battle. Despite the risks, Emergency FTL saves the vast, vast majority of your ships and brings them home safely, if damaged. It's always more reliable than disengaging, and the enemy can do little against it.

One extra thing to consider here is the war doctrine No Retreat. No Retreat, only available to Militarist and Gestalt empires, increases your ship fire rate by a whopping 33%, which is amazing, probably the strongest boost in the game, on top of the already big bonus militarists and genocidals get. Of course, there is a big downside: You can't disengage at all anymore, meaning any ships that get blasted are gone. Your Emergency FTL also takes a lot longer to charge up, making it much less reliable and useful.
Whether this is worth is depends on your playstyle. If you're relying on one big battle to defeat an enemy (common for Endgame Crises, for instance), this can often be worth it. The extra fire rate can turn many narrow defeats into great victories. But they'll still be victories with more casualties on your side you wouldn't otherwise have had.
Applying all this knowledge: A practical example
That's a ton of information I just told you about. It's perfectly normal if this still seems a bit confusing to you, and difficult to tell how to apply all this in your own run. So let's end with a practical example. We're going to look at an enemy fleet and design some ships of our own to counter it as best we can.
In this case the fleet we want to defeat is this Marauder fleet, consisting of a mix of cruisers, destroyers (called Frigates), and corvettes (called Raiders):

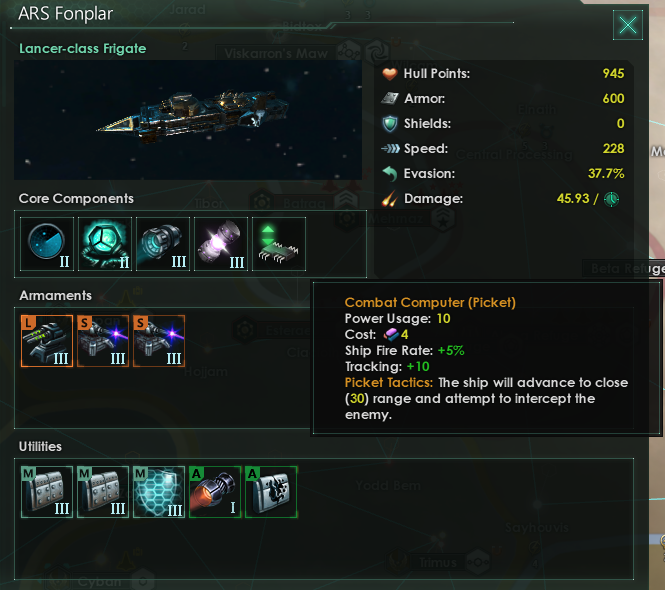

Looking at these designs there's some things that spring out immediately: First of all, they use a lot more kinetic than energy. Only the frigates have a bit more lasers than cannons, the others overwhelmingly use kinetic. This means we should focus on armor rather than shields.
Next: The enemy only uses regular weapons. No explosives or hangars. This means our fleet won't need Point-Defense to defend itself.
To add onto the previous point, the enemy has no PD of its own. This means we will be able to use explosives and strike craft to devastating effect.
The enemy has a decent mix of shields and armor (for some reason the stats at the top-right list shields as 0, this is a display error), though leaning more towards armor on their smaller craft. This means that we will want to lean towards energy weapons on our ships as well, particularly the ones that are going to be focused on taking down those smaller craft.
Their Raiders have good evasion, 77%, while their destroyers have 37%, and their cruisers 21%. These are all very good evasion numbers on their part, meaning we'll want to compensate with tracking (though we also want to be careful not to overkill on the tracking either).
One minor thing to note is that the enemy cruisers are set by their combat computer to a range of 50, while some of their weapons, the Ripper Autocannons, only have a range of 30. So these ships won't use their full arsenal unless our ships explicitly get in range.
So based on this, let's design some ships of our own!
The Corvette
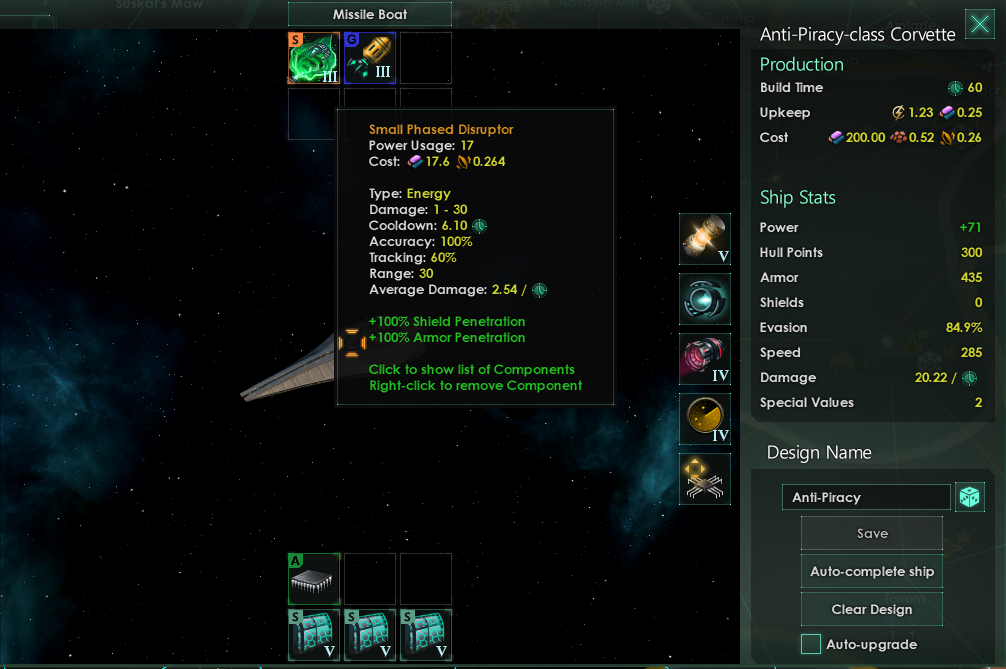
The corvette is outfitted with a missile segment, giving it those sweet sweet torpedoes those marauders can do nothing against. As the small weapon I actually went with the Disruptor, despite its relatively low average damage: The disruptor, like the torpedo, has penetration, meaning it'll do direct damage on the hull. This syncs well with the explosives. If we had used a kinetic weapon instead, it would simply attack the shields the torpedoes are already penetrating, dealing damage that doesn't matter.
Defensively it is all armor to counter the enemy's heavily kinetic build. This also has the side benefit of saving us a lot of power we'd otherwise use on shields, giving us a small (3%) bonus to evasion, speed, and fire rate from Excess Power. It's not much, but always nice to have.
The combat computer is set to Swarm, allowing the corvettes to get in close and make sure their torpedoes hit as fast as possible, while also increasing their evasion.
The support module is set to an Auxiliary Control Unit, which increases chance to hit. Torpedoes have relatively low tracking, so the ACU will help hit those fast-moving enemy raiders.
The Destroyer
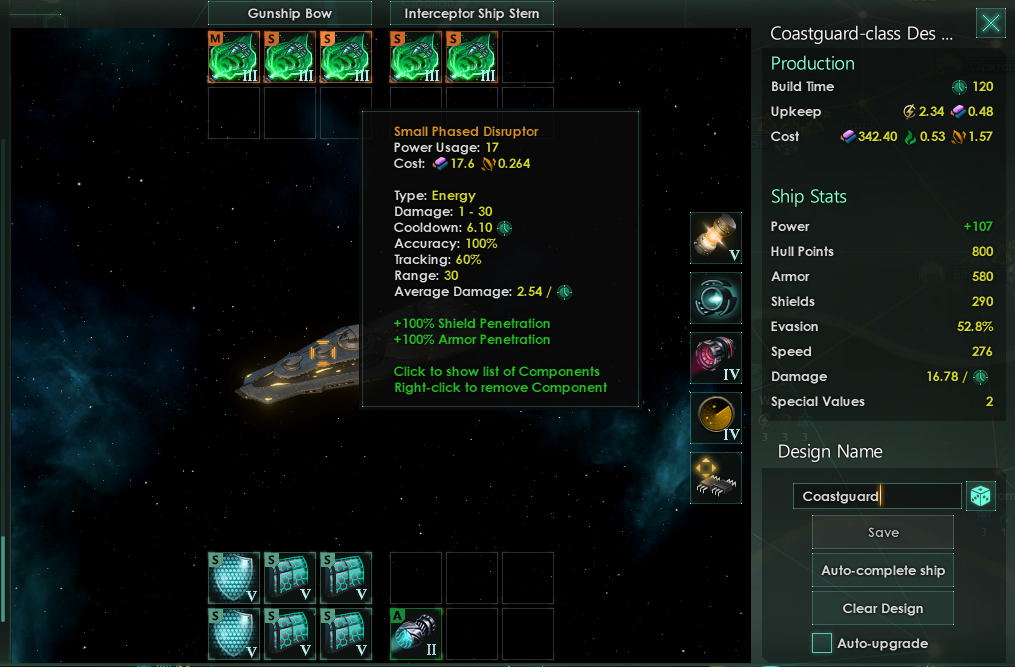
Destroyers can't actually have any explosives or hangars, so they're not very useful against this type of fleet. If I had to design one, it'd be this, with heavy use of disruptors to support the rest of the fleet using explosives, but honestly, I'd just not build destroyers at all in this case. Note how the corvette has pretty much the same Damage per Day for almost half the build cost, and higher evasion to boot.
The Cruiser

For Cruisers we get a choice on whether to use explosives or strike craft. In this case I went for explosives, mostly because the hangar segment always come with PD of their own, and against this fleet we don't need PD.
For regular weapons I actually went for mostly kinetic, despite my mentioning earlier that energy would be better against the enemy's armor. The reason for this is that the combat computer is set to Line, with a range of 50. Energy weapons of Small size have a range of 40, so they wouldn't actually fire. Better to use the kinetic weapons of range 50 that will at least do some damage. Note that the medium size module does have a laser, as it has the extra range it needs to participate.
Defensively, I went for a bit of shields, mostly to tank some damage that won't have to be repaired at a shipyard. I also added a few hull modules, to increase the maximum hull amount, and thus the chance of successful disengagement if necessary. Other than that, again mostly armor. For support we again have the ACU for increased chance to hit on the torpedoes.
The Battleship

Finally, for the Battleship I had the option to go for Strike Craft, but again I opted not to, because they come with small weapon modules and point-defense, all of which we don't want on a long-range ship like this. Like the destroyer it's not the most optimal type to fight the marauders, but this is the best design I could come up with for the situation. It's set to artillery stance, so range 80. For that range we need Large or X weapons all around.
The artillery is a mix of kinetic and artillery, mostly designed to blast away the enemy shields early and then just do as much damage as possible. The X weapon is an Arc Emitter. Like the disruptor, it penetrates all armor and shields and does immense damage directly to hull. Since weapons of this size already have great accuracy, the battleship doesn't need an ACU support module. Bringing accuracy from 100% to 105% doesn't really matter except against evasive corvettes, and L or X weapons tend to be garbage against corvettes anyway. Instead it has afterburners for some extra speed to help it keep up with the rest of the fleet.
The Fleet
So that's our designs. Which do we use, and in what ratio? For this case I definitely wouldn't use the destroyers, and probably not many of the battleships. Instead a mix of corvettes and cruisers would overwhelm the marauders with torpedoes and disruptor fire, while enjoying good evasion and good disengagement chance, as well as a lot of armor to counter the enemy kinetics. A few battleships could be good to take out some enemy ships before they even get into range, but they wouldn't be dealing the brunt of the hull damage.
Conclusion
That's pretty much all I have to tell about ships and naval combat! There are some topics I haven't really gone into, like troop transports, Titan auras, Colossi, starbases, and admirals, but I think that with the knowledge you have now you should be more than capable of figuring those out by yourself.
Hopefully with this you'll be able to defend your empire a lot better, and if so ethically inclined, impose your will on the rest of the galaxy. If you have any remarks, questions, or other topics that remain unclear, please leave a comment!
Godspeed, admiral, and remember: In space, no one can hear your enemies scream.
How To Design Video Game Combat
Source: https://steamcommunity.com/sharedfiles/filedetails/?id=705465925
Posted by: ellisreem1944.blogspot.com
0 Response to "How To Design Video Game Combat"
Post a Comment